Is Your Swimming Pool Losing Water? Essential Leak Detection & Repair
A swimming pool is a wonderful addition to any home, but a noticeable drop in your water level can quickly turn that joy into a headache. While evaporation is normal, especially on hot, sunny days, an unexplained loss of more than an inch of water in 24 hours might signal a leak. Ignoring it can lead to wasted water, higher utility bills, and potentially costly damage to your pool structure or surrounding deck.
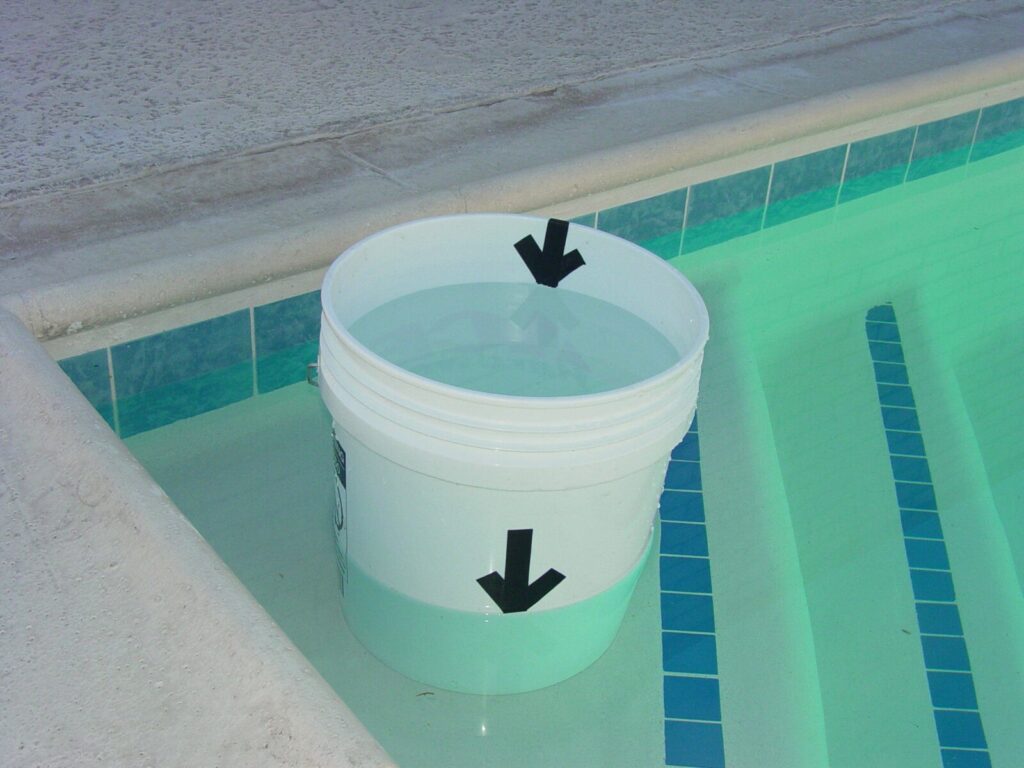
Step 1: Confirming the Leak (The Bucket Test)
Before calling a professional, perform a simple bucket test to confirm a structural leak versus natural evaporation.
- Place a bucket of pool water on a pool step (make sure the water level inside the bucket matches the pool’s water level outside the bucket). Use a rock or brick to weigh it down.
- Mark the water level inside the bucket and the pool’s water level on the outside of the bucket.
- Let the bucket sit for 24 hours.
- After 24 hours, compare the two marks. If the pool’s water level has dropped significantly more than the water level inside the bucket, you likely have a leak.
Step 2: Finding the Leak’s Location
Once a leak is confirmed, the next step is locating it. The most common leak spots are the skimmers, return lines, main drains, and the pool structure itself.
- Pipes and Equipment: Check the filter, pump, and heater for visible drips or wet ground around them. Leaks in the equipment pad are often the easiest to spot and repair.
- Dye Test: If you suspect a crack in the skimmer, a light fixture, or the pool shell, use a few drops of a pool-safe leak detection dye (available at most pool supply stores). With the pump off and the water still, gently squirt the dye near the suspected area. If there’s a leak, the dye will be sucked into the crack or hole.
- Pressure Testing: For leaks in the underground plumbing (return and skimmer lines), a professional leak detection specialist uses specialized equipment like hydrophones (underwater microphones) or pressure testing tools to pinpoint the exact location of the pipe breach without having to dig up your entire yard.
Step 3: Repairing Common Pool Leaks
The repair method depends entirely on the leak’s location and size.
- Small Cracks and Punctures (Vinyl Liner or Concrete/Gunite): Small leaks in the pool shell or liner can often be temporarily fixed using an underwater patch kit or a two-part epoxy sealant. For vinyl pools, cut a patch slightly larger than the hole, apply the adhesive, and hold it firmly in place. For concrete pools, use a waterproof hydraulic cement or specialized pool putty.
- Skimmer Leaks: Leaks where the skimmer meets the pool wall are very common. These are typically sealed with pool-grade silicone caulk or epoxy.
- Plumbing Leaks: Leaks in underground pipes are the most invasive to repair. They often require the services of a specialist who will inject a chemical sealant into the pipe or, in more severe cases, excavate the area to replace the damaged section of pipe entirely.
Don’t delay! Even a small leak can quickly become a big problem. Addressing the issue promptly will save you water, chemicals, and potentially thousands in structural repairs down the line. If you’ve confirmed a leak but can’t find it, it’s time to call in the professionals.
Do you know how old your pool’s plumbing is? That can be a big factor in leak potential!